本文是构建能够每秒处理 3 百万请求的高性能 Web 集群系列文章的第一篇。它记录了我使用负载生成器工具的一些经历,希望它能帮助每一个像我一样不得不使用这些工具的人节省时间。

负载生成器是一些生成用于测试的流量的程序。它们可以向你展示服务器在高负载的情况下的性能,以及让你能够找出服务器可能存在的问题。通过负载测试了解服务器的缺点,是测试服务器弹性以及未雨绸缪的好方法。

负载生成工具(Load-Generating Tools)

在进行负责测试时要牢记一件重要的事:你能在 Linux 上建立多少个 socket 连接。这个限制是硬编码在内核里的,最典型的就是临时 W 端口的限制。(在某种程度上)你可以在 /etc/sysctl.conf 里扩展它。但是基本上,一台 Linux 机器只能同时打开大约 64,000 个 socket 。因此在负载测试时,我们不得不通过在单一的连接上尽可能多地发出请求来充分利用 socket 。 除此之外,我们还需要不止一台的机器来产生负载。否则,负载生成器会把可用的 socket 占用导致不能产生足够的负载。

我一开始用的是‘ab’,Apache Bench 。它是我所知道的 http 基准测试工具中最简单、最通用的。并且它是 Apache 附带的产品,因此它可能已经存在于你的系统中。不幸的是,我在使用它的时候每秒大约只能生成 900 个请求。虽然我见过其他人使用它每秒能达到 2,000 个请求,但我可以立即告诉你,‘ab’并不适合我们的基准测试。

Httperf

接着,我尝试了 ‘httperf’。这个工具更强大,但是它依然相对简单并且功能有限。要算出每秒生产了多少个请求并不是仅传递参数那么简单。经过我的多次尝试,获取了每秒超过几百请求的结果。例如:

它以每秒 1,000 个的速率创建了 100,000 个会话(session)。每次会话发起 5 次请求,时间间隔为 2 秒。

1
2
3
4
5
6
7
8
9
10
11
12
13
14
15
16
17
18
19
httperf --hog --server=192.168.122.10 --wsess=100000,5,2 --rate 1000 --timeout 5

Total: connections 117557 requests 219121 replies 116697 test-duration 111.423 s

Connection rate: 1055.0 conn/s (0.9 ms/conn, <=1022 concurrent connections)
Connection time [ms]: min 0.3 avg 865.9 max 7912.5 median 459.5 stddev 993.1
Connection time [ms]: connect 31.1
Connection length [replies/conn]: 1.000

Request rate: 1966.6 req/s (0.5 ms/req)
Request size [B]: 91.0

Reply rate [replies/s]: min 59.4 avg 1060.3 max 1639.7 stddev 475.2 (22 samples)
Reply time [ms]: response 56.3 transfer 0.0
Reply size [B]: header 267.0 content 18.0 footer 0.0 (total 285.0)
Reply status: 1xx=0 2xx=116697 3xx=0 4xx=0 5xx=0

CPU time [s]: user 9.68 system 101.72 (user 8.7% system 91.3% total 100.0%)
Net I/O: 467.5 KB/s (3.8*10^6 bps)

最终,我使用这些设置达到了每秒 6,622 个连接:

1
httperf --hog --server 192.168.122.10 --num-conn 100000 --ra 20000 --timeout 5

(总共创建了 100,000 个连接,并且以每秒 20,000 个连接的固定速率创建)

它还有一些潜在的优势,并且拥有比‘ab‘更多的特性。但它不是我要用在这个项目里的重量级工具。我需要的是能够支持分布式多负载测试节点的工具。因此,我的下一个尝试是:Jmeter。

Apache Jmeter

这是一个功能齐全的 web 应用测试套件,它可以模拟真实用户的所有行为。你可以使用 Jmeter 的代理去访问你的网站,进行点击、登陆、模仿用户可以做的所有行为。Jemeter 会把这些行为记录下来作为测试用例。然后 Jmeter 会反复执行这些动作来模拟你想要的用户数量。尽管配置 Jmeter 比 ‘ab‘ 和 ’httperf‘ 复杂得多,但它是一个很有趣的工具!

根据我的测试,它每秒可以产生 14,000 个请求!这绝对是一个好的进展。

我使用了 Googlle Code project 上的一些插件,并且使用它们的“Stepping Threads”和“HTTP RAW”请求,最终每秒大约可以产生 30,000 个请求!但这已经达到极限了,所以还要寻找另一个工具。这里有一个我之前的 Jmeter 配置,希望可以帮助到其他人。虽然这个配置离完美相差甚远,但有时它可以满足你的要求。

Tsung: 重型的(heavy-duty)、分布式的、多协议测试工具

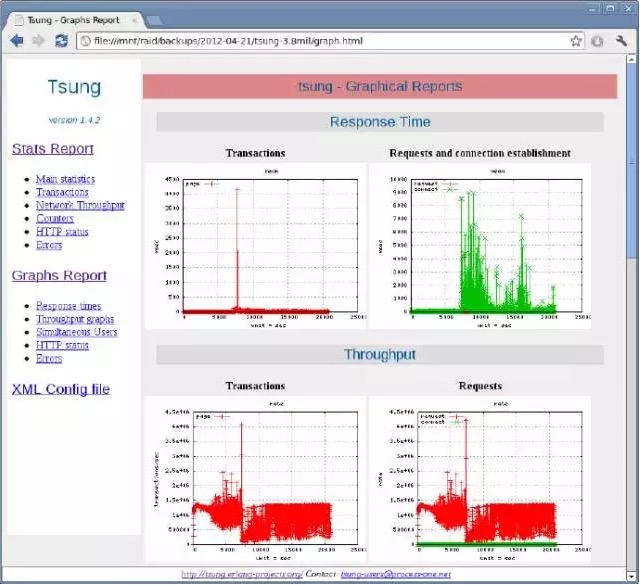
它每秒基本可以产生 40,000 个请求,这绝对是我们想要的工具。类似于 Jmeter,你可以把一些行为记录下来在测试时运行,并且可以测试大多数的协议。比如 SSL、HHTP、WebDAV、SOAP、PostgreSQL、MySQL、LDAP 和 Jabber/XMPP。与 Jmeter 不同的是,它没有让人感到迷茫的 GUI 设置,它仅有一个 XML 配置文件,和一些你选择的分布式节点的 SSH 密钥。它的简洁和效率对我的吸引力,完全不亚于它的健壮性和可扩展性。我发现它是一个很强大的工具,在正确的配置下它可以每秒产生百万级的 HTTP 请求。

除此之外,Tsung 还可以在 html 上产生图表以及输入你的测试的详细报告。测试的结果通俗易懂,并且你甚至可以把这些图片展示给你的 boss 看!

在这个系列文章的剩余部分,我还会讲解这个工具。现在你可以继续浏览下面的配置说明,或者直接跳到下一页。

在 CentOS 6.2 上安装 Tsung

首先,你要安装(Erlang 需要的) EPEL 源。因此,在进行下一步之前要把它安装好。安装完后,继续安装你用来产生负载的每个节点需要的包。如果你还没有在节点之间建立无密码 SSH 密钥(passwordless SSH key),那么请建立之。

1
yum -y install erlang perl perl-RRD-Simple.noarch perl-Log-Log4perl-RRDs.noarch gnuplot perl-Template-Toolkit firefox

从 Github 或者 Tsung 的官网上下载最新的 Tsung。

1
wget http://tsung.erlang-projects.org/dist/tsung-1.4.2.tar.gz

解压并且编译。

1
2
3
tar zxfv  tsung-1.4.2.tar.gz
cd tsung-1.4.2
./configure && make && make install

把示例配置复制到 ~/.tsung 目录里。这是 Tsung 的配置文件和日志文件的存放地方。

1
cp  /usr/share/doc/tsung/examples/http_simple.xml /root/.tsung/tsung.xml

你可以根据你的需求去编辑这个配置文件,或者使用我的配置文件。经过大量的尝试以及失败后,我目前的配置文件在使用 7 个分布式节点时可以每秒产生 5 百万个 HTTP 请求。

1
2
3
4
5
6
7
8
9
10
11
12
13
14
15
16
17
18
19
20
21
22
23
24
25
26
27
28
29
30
31
32
33
34
35
36
37
38
39
40
41
42
43
44
45
46
47
48
49
50
51
52
53
54
55
56
57
58
<?xml version="1.0"?>
<!DOCTYPE tsung SYSTEM "/usr/share/tsung/tsung-1.0.dtd">
<tsung loglevel="notice" version="1.0">

<clients>
<client host="localhost" weight="1" cpu="10" maxusers="40000">
<ip value="192.168.122.2"/>
</client>
<client host="loadnode1" weight="1" cpu="9" maxusers="40000">
<ip value="192.168.122.2"/>
</client>
<client host="loadnode2" weight="1" maxusers="40000" cpu="8">
<ip value="192.168.122.3"/>
</client>
<client host="loadnode3" weight="1" maxusers="40000" cpu="9">
<ip value="192.168.122.21"/>
</client>
<client host="loadnode4" weight="1" maxusers="40000" cpu="9">
<ip value="192.168.122.11"/>
</client>
<client host="loadnode5" weight="1" maxusers="40000" cpu="9">
<ip value="192.168.122.12"/>
</client>
<client host="loadnode6" weight="1" maxusers="40000" cpu="9">
<ip value="192.168.122.13"/>
</client>
<client host="loadnode7" weight="1" maxusers="40000" cpu="9">
<ip value="192.168.122.14"/>
</client>
</clients>

<servers>
<server host="192.168.122.10" port="80" type="tcp"/>
</servers>

<load>
<arrivalphase phase="1" duration="10" unit="minute">
<users maxnumber="15000" arrivalrate="8" unit="second"/>
</arrivalphase>

<arrivalphase phase="2" duration="10" unit="minute">
<users maxnumber="15000" arrivalrate="8" unit="second"/>
</arrivalphase>

<arrivalphase phase="3" duration="30" unit="minute">
<users maxnumber="20000" arrivalrate="3" unit="second"/>
</arrivalphase>

</load>

<sessions>
<session probability="100" name="ab" type="ts_http">
<for from="1" to="10000000" var="i">
<request> <http url="/test.txt" method="GET" version="1.1"/> </request>
</for>
</session>
</sessions>
</tsung>

刚开始的时候有很多东西要理解,但你一旦理解了它们后就会变得很简单。

只是简单地指定了运行 Tsung 的主机。你可以指定 Tsung 使用的 IP 和 CPU 的最大数。你可以使用 maxusers 设置节点能够模拟的用户数量上限。每一个用户都会执行我们之后定义的操作。

指定了你要测试的 HTTP 服务器。我们可以使用这个选项去测试一个 IP 集群,或者一个单一的服务器。

定义了我们的模拟用户将会在什么时候“到达”我们的网站。以及它们达到的有多快。

在持续了 10 分钟的第一个阶段里,以 每秒 8 个用户的速率到达了 15,000 个用户。


这里还有两个 arrivalphases,它们的用户都以同样的方式达到。
这些 arrivalphases 一起组成了一个 ,它控制了我们可以每秒产生多少个请求。

这部分定义了一旦这些用户达到了你的网站,它们将会执行什么动作。
probability 允许你定义用户可能会做的随机事件。有时他们可能点击这里,有时他们可能点击那里。所有的Probability 加起来一定要等于 100% 。
在上面的配置里,用户只做一件事,所以它的 probability 等于 100% 。

这就是用户在 100% 的时间里做的事情。它们循环遍历 10,000,000 次并且 一个网页:/test.txt 。
这个循环结构允许我们使用少量的用户连接去获取比较大的每秒请求数量。

一旦你已经很好地理解了它们,你就可以创建一个便利的别名,去快速观察 Tsung 报告。

1
2
3
4
vim ~/.bashrc
alias treport="/usr/lib/tsung/bin/tsung_stats.pl; firefox report.html"

source ~/.bashrc

然后启动 Tsung

1
2
3
[root@loadnode1 ~] tsung start
Starting Tsung
"Log directory is: /root/.tsung/log/20120421-1004"

结束后观察报告

1
2
cd /root/.tsung/log/20120421-1004
treport

使用 Tsung 去规划你的集群构造

现在我们拥有了一个足够强大的负载测试工具,我们可以规划余下的集群构造了:

  1. 使用 Tsung 去测试一个单一的 HTTP 服务器。获取一个基本的基准。
  2. 对 web 服务器进行调优,定期使用 Tsung 进行测试提高性能。
  3. 对这些系统的 TCP 套接字进行调优,获取最佳的网络性能。再来一次,测试,测试,不停地测试。
  4. 构造 LVS 集群,它包含了这些充分调优过的 web 服务器。
  5. 使用 Tsung IP 集群对 LVS 进行压力测试。

在之后的两篇文章里,我将会向你展示如何使你的 web 服务器获取最高性能,以及怎样用 LVS 集群软件把它们整合起来。

概述

Geode是一个提供实时、一致访问大型分布式云平台下数据密集型应用的数据管理平台。最近开源啦!

Geode 通过跨多进程,把内存、CPU、网络资源和可选的本地磁盘汇集起来,来管理应用程序对象及其行为。它使用动态复制和数据分片技术,来实现高可用性,改善性能、可伸缩性和容错。Geode 除了是一个分布式数据容器,它还是一个内存数据管理系统,提供了可靠的异步事件通知和有保证的消息传递。

Geode 是一个非常成熟、健壮的产品,它的前身可以追溯到第一个由 Smalltalk 构造的对象数据库:GeoStone。作为一个事务性、低延迟的数据引擎,多个华尔街交易平台首次将 Geode(称为GemFire™)部署在金融部门。如今已有超过 600 家企业用户将 Geode 用于大规模、7*24 业务核心应用程序中。其中一个应用案例就是中国国家铁路将 Geode 用于整个国家的铁路票务系统,10 个节点集群管理着 2TB 的内存热数据,以及 10 个备份节点作为高可用性和弹性扩展。

主要概念和组件

在 Geode 分布式系统中,“缓存”是用来形容一个节点的抽象概念。

在每个缓存中,由您定义数据区域。数据区域(Data region)类似于关系型数据库的表,并且作为“name/value 对”以分布式方式管理数据。复制区域(replicated region)存储着 {分布式系统中每个缓存成员数据的} 相同副本。分区区域(partitioned region)在缓存成员之间传播数据。系统配置之后,客户端应用 {在不了解底层系统架构的情况下} 也可访问区域中的分布式数据。当数据发生改变的时候,您可以定义监听器来接收通知,并且您也可以定义过期条件,来删除区域中的过期数据。

定位器(Locator)提供发现服务和负载均衡服务。您可通过定位器服务列表来配置客户端,定位器维护着一个动态成员服务器列表。默认情况下,Geode 客户端和服务器使用40404端口,以及通过使用多播互相通信。

Geode 包含以下特性:

  • 结合冗余、复制和“非共享”的持久化架构,来实现故障安全可靠性(译者解释:高可用,防止单点故障)和性能。

  • 可水平扩展至成千上万个缓存成员,并结合多个缓存拓扑来满足不同的企业需求。该缓存可以分布在多个计算机中。

  • 异步和同步缓存更新传播(propagation)。

  • Delta 仅在一个对象(delta)新旧不同版本之间传播,而不是整个对象,从而极大降低了分发成本。

  • 可靠的异步事件通知,优化后的、低延迟的分布层保证了消息传递。

  • 无需额外的硬件,应用程序即可提速 4~40 倍。

  • 数据敏感和实时业务智能。如果在您检索时数据发生更改,您能立即看到数据的变化。

  • 与 Spring 框架集成,以加速并简化可扩展的事务型企业应用程序的开发。

  • 支持 JTA 事务。

  • 整个集群范围的配置,可以持久化,并可导出到其他集群。

  • 通过 HTTP 即可实现对集群远程管理。

  • 为 REST 应用程序开发提供 REST API 支持。

  • 在主版本发布之间滚动升级。

Geode 5分钟入门

从 Pivotal 获取源文件,从源文件中提取并构建(注:目前 Geode 支持 jdk1.7.75):

1
2
$ cd geode
$ ./gradlew build installDist

启动定位器和服务器:

1
2
3
4
$ cd gemfire-assembly/build/install/geode
$ ./bin/gfsh
gfsh> start locator --name=locator
gfsh> start server --name=server

创建一个区域:

1
gfsh> create region --name=region --type=REPLICATE

编写一个客户端应用程序:

HelloWorld.java

1
2
3
4
5
6
7
8
9
10
11
12
13
14
15
16
17
18
19
import java.util.Map;
import com.gemstone.gemfire.cache.Region;
import com.gemstone.gemfire.cache.client.*;
public class HelloWorld {
public static void main(String[] args) throws Exception {
ClientCache cache = new ClientCacheFactory()
.addPoolLocator("localhost", 10334)
.create();
Region<String, String> region = cache
.<String, String>createClientRegionFactory(ClientRegionShortcut.CACHING_PROXY)
.create("region");
region.put("1", "Hello");
region.put("2", "World");
for (Map.Entry<String, String> entry : region.entrySet()) {
System.out.format("key = %s, value = %sn", entry.getKey(), entry.getValue());
}
cache.close();
}
}

编译并运行 HelloWorld.java。classpath 中应包含 gemfire-core-dependencies.jar 包:

1
2
javac -cp /some/path/geode/gemfire-assembly/build/install/geode/lib/gemfire-core-dependencies.jar HelloWorld.java
java -cp .:/some/path/geode/gemfire-assembly/build/install/geode/lib/gemfire-core-dependencies.jar HelloWorld

应用程序开发

Geode 应用程序可以用很多种客户端技术实现:

Java 通过使用 Geode 客户端 API,或者嵌入式使用 Geode API

Spring Data GemFire或 Spring Cache

Python(https://github.com/gemfire/py-gemfire-rest)

REST

memcached
英文出处:Geode
译文出处:伯乐在线-Martin
译文链接:http://blog.jobbole.com/87810/

以centos 系统为例:

添加httpd-tools工具

1
yum -y install httpd-tools

修改nginx 配置文件

1
vi /etc/nginx/conf.d/default.conf

在server内增加

1
2
3
4
location /basic {
auth_basic "Basic Auth";
auth_basic_user_file "/etc/nginx/.htpasswd";
}

创建一个用户 fedora 替换成你自己的账号,回车输入密码并确认

1
htpasswd -c /etc/nginx/.htpasswd fedora

重启nginx服务

1
/etc/rc.d/init.d/nginx restart

或者

1
service nginx reload

1
service nginx restart

struts2 modelDriven 高级应用

Build Status

#封装的第四种Action传参方式

##传统的struts传参有三种

    1. 通过属性传参
    1. 通过域模型传参
    1. 通过模型驱动传参数

##以上这三种各有利弊,总之一句话概括,无法完全的实现业务和参数分离.总得在自己的Action中定义相关的get set 方法.

希望能实现参数传递跟业务action完全分离.故封装了模型驱动参数获取方式.

#如此一来,action 还可以这样写:

-Action

1
2
3
4
5
6
public class YourAction extends BaseActionSupport<YourParam> {

//TODO your code ....
//在需要获取request参数的地方只需要通过 formParam对象get你需要的参数即可

}

-param class 就是一个简单的po类.随你写喽!

1
2
3
4
public class yourParam{
// 各种 param fields
// 各种 get set
}

#OK 所有的action请求,都会自动的封装到你定义的param类中. 前提这个类要有不带参数的构造方法,要有你希望获取的参数的get set 方法.

其实就是把action中的各种 get set 放到了一个统一的param类中.

一个action 一个 param类. 是不是很清晰.业务跟参数代码分离了. struts action 是不是更易读了.

附: 顺带将 BaseActionSupport 放入了一个applicationContext

这样所有的action 都可以直接使用applicationContext 对象,如果您不喜欢可以自行去掉.

##步骤如下:

    1. 删除 protected ApplicationContext applicationContext;
    1. 删除 applicationContext 的 set方法
    1. 去掉实现的接口 ApplicationContextAware

#不过建议留着吧.

  • 当你用上 spring 的event 的时候,你会需要它.
  • 当你需要动态的根据className 或者 classType 获取bean 的时候,你会需要它.

图

spring-boot-actuator-monitor

基于spring boot的 监控平台

#spring-boot-admin 监控后台

  1. 新建一个maven工程 boot-admin , 继承 spring-boot-starter-parent

    1
    2
    3
    4
    5
    6

    <parent>
    <groupId>org.springframework.boot</groupId>
    <artifactId>spring-boot-starter-parent</artifactId>
    <version>1.2.4.RELEASE</version>
    </parent>
  2. 加入依赖

1
2
3
4
5
6
7
8
9
10
11
12
13
14
15
16
17
18
19
20
21
22
23
<dependency>
<groupId>org.springframework.boot</groupId>
<artifactId>spring-boot-starter-web</artifactId>
</dependency>
<dependency>
<groupId>de.codecentric</groupId>
<artifactId>spring-boot-admin-server</artifactId>
<version>1.2.1</version>
</dependency>
<dependency>
<groupId>de.codecentric</groupId>
<artifactId>spring-boot-admin-server-ui</artifactId>
<version>1.2.1</version>
</dependency>
<dependency>
<groupId>org.springframework.boot</groupId>
<artifactId>spring-boot-starter-security</artifactId>
</dependency>
<dependency>
<groupId>com.googlecode.json-simple</groupId>
<artifactId>json-simple</artifactId>
<optional>false</optional>
</dependency>
  1. 加入plugin 以 exec jar包运行

    1
    2
    3
    4
    5
    6
    7
    8
    9
    10
    11
    12
    13
    14
    15

    <plugin>
    <groupId>org.springframework.boot</groupId>
    <artifactId>spring-boot-maven-plugin</artifactId>
    <executions>
    <execution>
    <goals>
    <goal>repackage</goal>
    </goals>
    <configuration>
    <classifier>exec</classifier>
    </configuration>
    </execution>
    </executions>
    </plugin>
  2. 新建执行执行类 com.izerui.boot.admin.Application.java

1
2
3
4
5
6
7
8
9
@SpringBootApplication
@EnableAdminServer
@EnableDiscoveryClient
public class Application {

public static void main(String[] args) {
SpringApplication.run(Application.class,args);
}
}
  1. 声明监控后台的应用名称、端口、上下文、基本授权验证用户名、密码等信息 application.properties
1
2
3
4
5
6
7
# application
server.port = 8888

# basic security
security.ignored=/api/**
security.user.name=boot
security.user.password=boot1234
  1. mvn install 后 执行 java -jar boot-admin-exec.jar

  2. 访问 http://主机ID:端口/boot-admin


注册应用到监控后台

  1. 确保应用继承 spring-boot-starter-parent

    1
    2
    3
    4
    5
    6

    <parent>
    <groupId>org.springframework.boot</groupId>
    <artifactId>spring-boot-starter-parent</artifactId>
    <version>1.2.4.RELEASE</version>
    </parent>
  2. 引入依赖

1
2
3
4
5
6
7
8
9
10
<dependency>
<groupId>de.codecentric</groupId>
<artifactId>spring-boot-admin-starter-client</artifactId>
<version>1.2.1</version>
</dependency>
<dependency>
<groupId>com.googlecode.json-simple</groupId>
<artifactId>json-simple</artifactId>
<optional>false</optional>
</dependency>
  1. 配置被监控的应用的名称和监控后台地址 application.properties

    jar 方式运行

    web application

    server.port=28584
    info.version=@pom.version@
    info.info=微信代理服务
    management.context-path=/management
    server.context-path=/@pom.artifactId@
    endpoints.jmx.domain=@pom.artifactId@
    spring.application.name=@pom.artifactId@

    boot admin

    spring.boot.admin.url=http://192.168.1.128:8888/boot-admin


    war 方式运行

    web application

    info.version=@pom.version@
    info.info=阿里支付服务
    management.context-path=/management
    endpoints.jmx.domain=@pom.artifactId@
    spring.application.name=@pom.artifactId@

    boot admin

    spring.boot.admin.url=http://192.168.1.128:8888
    spring.boot.admin.client.service-url=http://192.168.1.106:8098/qq-pay-web

注意: 别忘了添加logging配置
# LOGGING
logging.file=/tmp/logs/offline-proxy-tcp.log

注意: 有些应用被权限框架拦截了。故需要加入 
management.context-path=/management 
并在权限框架内 将 /management/** = anon 权限放开,声明url注意上下文。
  1. 配置logback的jmx接口调用

    1
    2
    3
    4
    5
    6
    7
    8
    9
    10
    <?xml version="1.0" encoding="UTF-8"?>
    <configuration>
    <include resource="org/springframework/boot/logging/logback/base.xml"/>
    <jmxConfigurator/>
    <logger name="com.izerui" level="DEBUG"/>
    <root level="INFO">
    <appender-ref ref="CONSOLE" />
    <appender-ref ref="FILE" />
    </root>
    </configuration>
  2. 发布自定义jmx接口

在spring bean 类的头信息上增加注解 @ManagedResource(currencyTimeLimit = 20) 和 @Lazy

声明属性: @ManagedAttribute(description = "当前TCP连接数")

声明方法: @ManagedOperation(description = "关闭对应IP的所有连接")
          @ManagedOperationParameters(
            @ManagedOperationParameter(name = "ip", description = "终端IP")
          )

参考资料:

实现cas ticket基于redis的集群

目的

克服cas单点故障,将cas认证请求分发到多台cas服务器上,降低负载。

实现思路:

采用统一的ticket存取策略,所有ticket的操作都从中央缓存redis中存取。
采用session共享,session的存取都从中央缓存redis中存取。

前提:

这里只讲解如何实现cas ticket的共享,关于session的共享请移步:

实现步骤:

  1. 基于cas源码 新增模块 cas-server-integration-redis

    pom.xml 文件如下:

    1
    2
    3
    4
    5
    6
    7
    8
    9
    10
    11
    12
    13
    14
    15
    16
    17
    18
    19
    20
    21
    22
    23
    24
    25
    26
    27
    28
    29
    30
    31
    32
    33
    34
    35
    36
    37
    38
    39
    40
    41
    42
    43
    44
    45
    46
    47
    48
    49
    	
    <?xml version="1.0" encoding="UTF-8"?>
    <project xmlns="http://maven.apache.org/POM/4.0.0"
    xmlns:xsi="http://www.w3.org/2001/XMLSchema-instance"
    xsi:schemaLocation="http://maven.apache.org/POM/4.0.0 http://maven.apache.org/xsd/maven-4.0.0.xsd">
    <parent>
    <artifactId>cas-server</artifactId>
    <groupId>org.jasig.cas</groupId>
    <version>4.0.2</version>
    </parent>
    <modelVersion>4.0.0</modelVersion>

    <artifactId>cas-server-integration-redis</artifactId>

    <dependencies>

    <dependency>
    <groupId>org.jasig.cas</groupId>
    <artifactId>cas-server-core</artifactId>
    <version>${project.version}</version>
    </dependency>

    <dependency>
    <groupId>org.jasig.cas</groupId>
    <artifactId>cas-server-support-saml</artifactId>
    <version>${project.version}</version>
    <scope>provided</scope>
    </dependency>


    <!-- redis -->
    <dependency>
    <groupId>org.springframework.data</groupId>
    <artifactId>spring-data-redis</artifactId>
    <version>1.5.1.RELEASE</version>
    </dependency>
    <dependency>
    <groupId>org.apache.commons</groupId>
    <artifactId>commons-pool2</artifactId>
    <version>2.2</version>
    </dependency>
    <dependency>
    <groupId>redis.clients</groupId>
    <artifactId>jedis</artifactId>
    <version>2.6.2</version>
    </dependency>
    </dependencies>

    </project>
  2. 添加类到 cas-server-integration-redis 模块的 org.jasig.cas.ticket.registry 包下

    RedisTicketRegistry.java

1
2
3
4
5
6
7
8
9
10
11
12
13
14
15
16
17
18
19
20
21
22
23
24
25
26
27
28
29
30
31
32
33
34
35
36
37
38
39
40
41
42
43
44
45
46
47
48
49
50
51
52
53
54
55
56
57
58
59
60
61
62
63
64
65
66
67
68
69
70
71
72
73
74
75
76
77
78
79
80
81
82
83
84
85
86
87
88
89
90
91
92
93
94
95
96
97
98
99
100
101
102
103
104
105
106
107
108
109
110
111
112
113
114
115
116
117
118
119
120
121
122
123
124
125
126
127
128
129
130
131
132
133
134
135
136
137
138
139
140
141
142
143
144
145
146
147
148
149
150
151
152
153
154
155
156
157
158
159
160
161
162
/*
* Licensed to Jasig under one or more contributor license
* agreements. See the NOTICE file distributed with this work
* for additional information regarding copyright ownership.
* Jasig licenses this file to you under the Apache License,
* Version 2.0 (the "License"); you may not use this file
* except in compliance with the License. You may obtain a
* copy of the License at the following location:
*
* http://www.apache.org/licenses/LICENSE-2.0
*
* Unless required by applicable law or agreed to in writing,
* software distributed under the License is distributed on an
* "AS IS" BASIS, WITHOUT WARRANTIES OR CONDITIONS OF ANY
* KIND, either express or implied. See the License for the
* specific language governing permissions and limitations
* under the License.
*/
package org.jasig.cas.ticket.registry;

import org.jasig.cas.ticket.ServiceTicket;
import org.jasig.cas.ticket.Ticket;
import org.jasig.cas.ticket.TicketGrantingTicket;
import org.springframework.beans.factory.DisposableBean;

import javax.validation.constraints.Min;
import javax.validation.constraints.NotNull;
import java.util.Collection;
import java.util.HashSet;
import java.util.Set;
import java.util.concurrent.TimeUnit;

/**
* Key-value ticket registry implementation that stores tickets in redis keyed on the ticket ID.
*
* @author Scott Battaglia
* @author Marvin S. Addison
* @since 3.3
*/
public final class RedisTicketRegistry extends AbstractDistributedTicketRegistry implements DisposableBean {

private final static String TICKET_PREFIX = "TICKETGRANTINGTICKET:";

/** redis client. */
@NotNull
private final TicketRedisTemplate client;

/**
* TGT cache entry timeout in seconds.
*/
@Min(0)
private final int tgtTimeout;

/**
* ST cache entry timeout in seconds.
*/
@Min(0)
private final int stTimeout;


/**
* Creates a new instance using the given redis client instance, which is presumably configured via
* <code>net.spy.redis.spring.redisClientFactoryBean</code>.
*
* @param client redis client.
* @param ticketGrantingTicketTimeOut TGT timeout in seconds.
* @param serviceTicketTimeOut ST timeout in seconds.
*/
public RedisTicketRegistry(final TicketRedisTemplate client, final int ticketGrantingTicketTimeOut,
final int serviceTicketTimeOut) {
this.tgtTimeout = ticketGrantingTicketTimeOut;
this.stTimeout = serviceTicketTimeOut;
this.client = client;
}

protected void updateTicket(final Ticket ticket) {
logger.debug("Updating ticket {}", ticket);
try {
this.client.boundValueOps(TICKET_PREFIX+ticket.getId()).set(ticket,getTimeout(ticket), TimeUnit.SECONDS);
} catch (final Exception e) {
logger.error("Failed updating {}", ticket, e);
}
}

public void addTicket(final Ticket ticket) {
logger.debug("Adding ticket {}", ticket);
try {
this.client.boundValueOps(TICKET_PREFIX+ticket.getId()).set(ticket,getTimeout(ticket),TimeUnit.SECONDS);
}catch (final Exception e) {
logger.error("Failed adding {}", ticket, e);
}
}

public boolean deleteTicket(final String ticketId) {
logger.debug("Deleting ticket {}", ticketId);
try {
this.client.delete(TICKET_PREFIX+ticketId);
return true;
} catch (final Exception e) {
logger.error("Failed deleting {}", ticketId, e);
}
return false;
}

public Ticket getTicket(final String ticketId) {
try {
final Ticket t = (Ticket) this.client.boundValueOps(TICKET_PREFIX+ticketId).get();
if (t != null) {
return getProxiedTicketInstance(t);
}
} catch (final Exception e) {
logger.error("Failed fetching {} ", ticketId, e);
}
return null;
}

/**
* {@inheritDoc}
* This operation is not supported.
*
* @throws UnsupportedOperationException if you try and call this operation.
*/
@Override
public Collection<Ticket> getTickets() {
Set<Ticket> tickets = new HashSet<Ticket>();
Set<String> keys = this.client.keys(TICKET_PREFIX + "*");
for (String key:keys){
Ticket ticket = this.client.boundValueOps(TICKET_PREFIX+key).get();
if(ticket==null){
this.client.delete(TICKET_PREFIX+key);
}else{
tickets.add(ticket);
}
}
return tickets;
}

public void destroy() throws Exception {
//do nothing
}

/**
* @param sync set to true, if updates to registry are to be synchronized
* @deprecated As of version 3.5, this operation has no effect since async writes can cause registry consistency issues.
*/
@Deprecated
public void setSynchronizeUpdatesToRegistry(final boolean sync) {}

@Override
protected boolean needsCallback() {
return true;
}

private int getTimeout(final Ticket t) {
if (t instanceof TicketGrantingTicket) {
return this.tgtTimeout;
} else if (t instanceof ServiceTicket) {
return this.stTimeout;
}
throw new IllegalArgumentException("Invalid ticket type");
}
}
**TicketRedisTemplate.java**
1
2
3
4
5
6
7
8
9
10
11
12
13
14
15
16
17
18
19
20
21
22
23
24
25
26
27
28
29
package org.jasig.cas.ticket.registry;

import org.jasig.cas.ticket.Ticket;
import org.springframework.data.redis.connection.RedisConnectionFactory;
import org.springframework.data.redis.core.RedisTemplate;
import org.springframework.data.redis.serializer.JdkSerializationRedisSerializer;
import org.springframework.data.redis.serializer.RedisSerializer;
import org.springframework.data.redis.serializer.StringRedisSerializer;

/**
* Created by serv on 2015/7/19.
*/
public class TicketRedisTemplate extends RedisTemplate<String, Ticket> {

public TicketRedisTemplate() {
RedisSerializer<String> string = new StringRedisSerializer();
JdkSerializationRedisSerializer jdk = new JdkSerializationRedisSerializer();
setKeySerializer(string);
setValueSerializer(jdk);
setHashKeySerializer(string);
setHashValueSerializer(jdk);
}

public TicketRedisTemplate(RedisConnectionFactory connectionFactory) {
this();
setConnectionFactory(connectionFactory);
afterPropertiesSet();
}
}
  1. cas-server-webapp 添加刚才新增模块的依赖

    1
    2
    3
    4
    5
    <dependency>
    <groupId>org.jasig.cas</groupId>
    <artifactId>cas-server-integration-redis</artifactId>
    <version>${project.version}</version>
    </dependency>
  2. 修改 spring配置文件 cas-server-webapp 模块 WEB-INF\spring-configuration\ticketRegistry.xml

    {% codeblock %}
    		
    		{% endcodeblock %}
    

    替换为

    {% codeblock %}


    		{% endcodeblock %}
    

    注意: 里面的 jedisConnFactory链接信息 修改为自己的连接串,这里选择database 1为存放cas票据的数据库

  1. 重新编译 mvn install

    生成的cas.war 部署到多个已经做过session共享的tomcat容器中。

tomcat-redis-session-manager

使用redis配置tomcat共享session

结构图:

分析:

分布式web server集群部署后需要实现session共享,针对 tomcat 服务器的实现方案多种多样,
比如 tomcat cluster session 广播、nginx IP hash策略、nginx sticky module等方案,
本文主要介绍了使用 redis 服务器进行 session 统一存储管理的共享方案。

必要环境:

  • java1.7
  • tomcat7
  • redis2.8

nginx 负载均衡配置

  1. 修改nginx conf配置文件加入
1
2
3
4
5
6
upstream tomcat {
server 200.10.10.67:8110;
server 200.10.10.67:8120;
server 200.10.10.44:8110;
server 200.10.10.66:8110;
}
  1. 配置 相应的server或者 location地址到 http://tomcat

tomcat session共享配置步骤

  1. 添加redis session集群依赖的jar包到 TOMCAT_BASE/lib 目录下

  1. 修改 TOMCAT_BASE/conf 目录下的 context.xml 文件

    1
    2
    3
    4
    5
    6
    7
    8
    9
    <Valve className="com.orangefunction.tomcat.redissessions.RedisSessionHandlerValve" />
    <Manager className="com.orangefunction.tomcat.redissessions.RedisSessionManager"
    host="localhost"
    port="6379"
    database="0"
    maxInactiveInterval="60"
    sessionPersistPolicies="PERSIST_POLICY_1,PERSIST_POLICY_2,.."
    sentinelMaster="SentinelMasterName"
    sentinels="sentinel-host-1:port,sentinel-host-2:port,.."/>

    属性解释:

    • host redis服务器地址
    • port redis服务器的端口号
    • database 要使用的redis数据库索引
    • maxInactiveInterval session最大空闲超时时间,如果不填则使用tomcat的超时时长,一般tomcat默认为1800 即半个小时
    • sessionPersistPolicies session保存策略,除了默认的策略还可以选择的策略有:
    • [SAVE_ON_CHANGE]:每次 session.setAttribute() 、 session.removeAttribute() 触发都会保存. 注意:此功能无法检测已经存在redis的特定属性的变化,权衡:这种策略会略微降低会话的性能,任何改变都会保存到redis中.
    • [ALWAYS_SAVE_AFTER_REQUEST]: 每一个request请求后都强制保存,无论是否检测到变化.注意:对于更改一个已经存储在redis中的会话属性,该选项特别有用. 权衡:如果不是所有的request请求都要求改变会话属性的话不推荐使用,因为会增加并发竞争的情况。
    • sentinelMaster redis集群主节点名称(Redis集群是以分片(Sharding)加主从的方式搭建,满足可扩展性的要求)
    • sentinels redis集群列表配置(类似zookeeper,通过多个Sentinel来提高系统的可用性)
    • connectionPoolMaxTotal
    • connectionPoolMaxIdle jedis最大能够保持idel状态的连接数
    • connectionPoolMinIdle 与connectionPoolMaxIdle相反
    • maxWaitMillis jedis池没有对象返回时,最大等待时间
    • minEvictableIdleTimeMillis
    • softMinEvictableIdleTimeMillis
    • numTestsPerEvictionRun
    • testOnCreate
    • testOnBorrow jedis调用borrowObject方法时,是否进行有效检查
    • testOnReturn jedis调用returnObject方法时,是否进行有效检查
    • testWhileIdle
    • timeBetweenEvictionRunsMillis
    • evictionPolicyClassName
    • blockWhenExhausted
    • jmxEnabled
    • jmxNameBase
    • jmxNamePrefix
  2. 重启tomcat,session存储即可生效

又是一个清明小长假,一个人远在深圳也没有回家,闲来无事写了一个zookeeper的数据浏览器。
上图:

使用上的技术:

  1. spring boot
  2. flex
  3. zookeeper curator client
  4. shiro security
  5. fastxml jackson
  6. spring mvc restful

基于spring boot微服务做的一个应用,以 独立jar包发布,内嵌了tomcat容器。因为一直也没有找到合适的可以方便管理和查看 zookeeper 数据的一个东东。就自己做了一个,方便公司的zk管理。

有兴趣的。或者也有同样需求的可以down下来玩玩。 东西虽小五张俱全。操作权限该有的都有。

项目地址: https://github.com/izerui/zookeeper-explorer